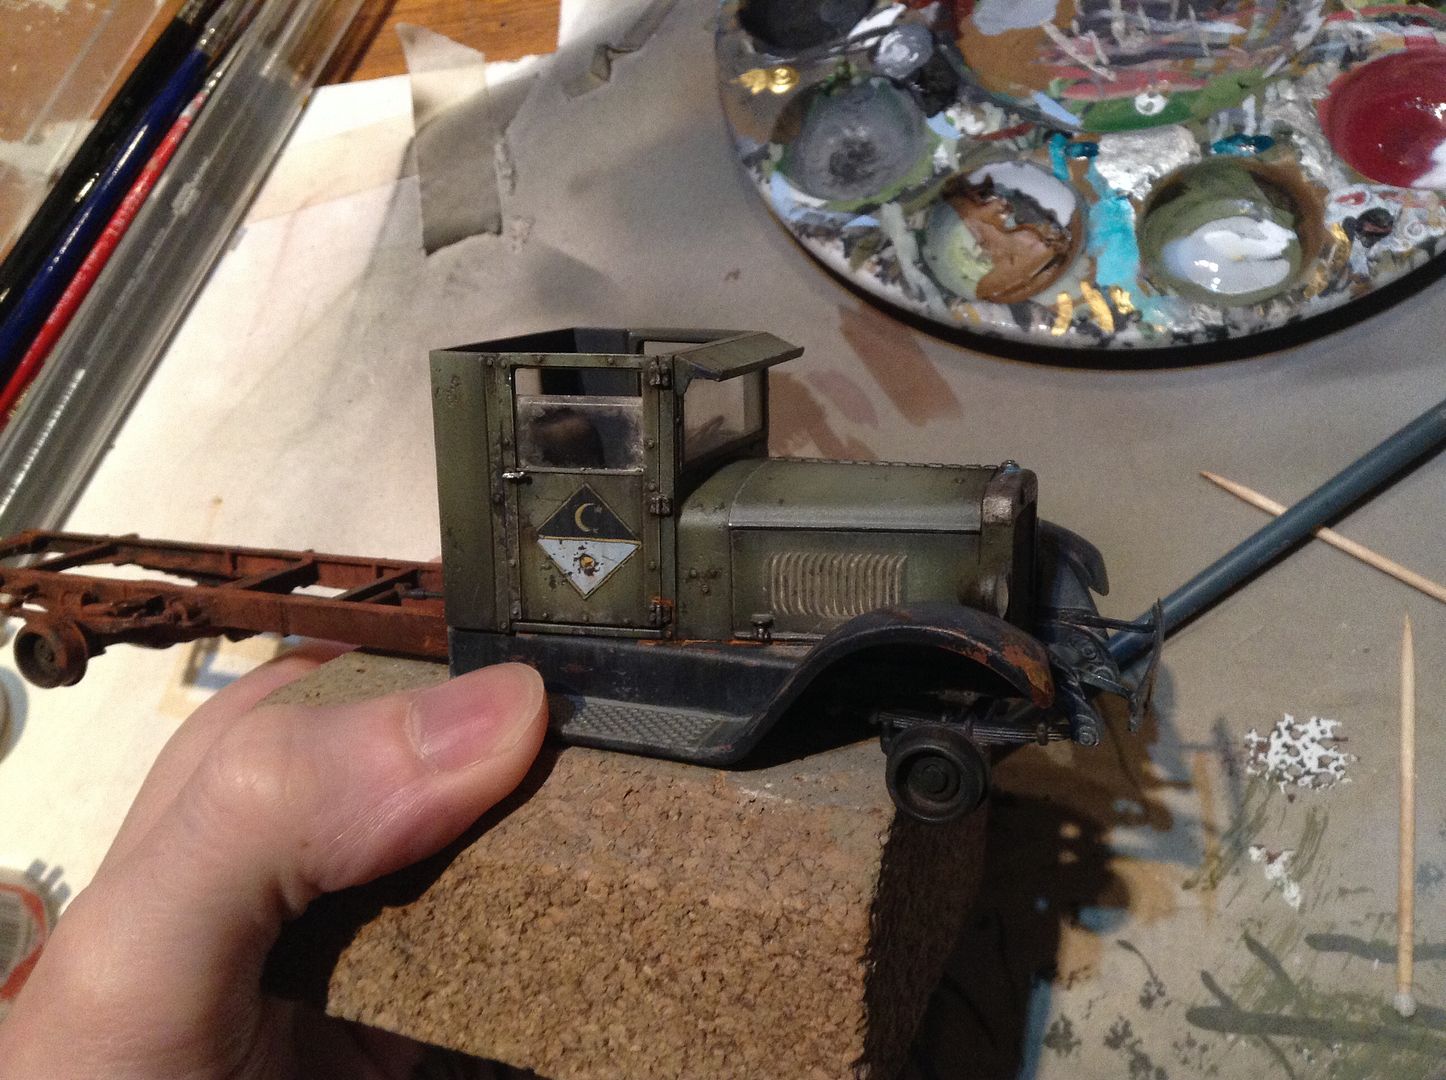
The Carnivàle Truck is very nearly finished now, when I get to this stage in a project I like to get a few photos of the model so I can see better what needs improving. For some reason, when you see the model on a screen you start to notice imperfections that you can't really pick up when looking at the model, the magnification helps too.
The weathering is mostly done with oil paints, either as pin-washes applied to the crevices and rivets, or applied neat and then blended in with white spirits in specific areas. The dusty areas again are mostly off-white oil paints, except on the windows which are AK Interactive pigments applied in a wash with water, then cleaned away with water. The windows deserve a mention, after reshaping the window frames quite significantly, the supplied panes wouldn't fit (and were way too thick anyway) so I cut some new ones from clear blister-pack plastic. Its not really that clear in these photos, but I scribed a line about 1mm in from all the edges on the inside of each pane to replicate a detail on the screen used vehicle.
An important lesson I've learned here is that the detritus I put inside the truck cab is entirely a waste of time. You can't see it on the real model, and you can't see it in the photos. It was fun to make though.
Right, on to the final touch-ups and then some proper photos of the finished truck.
Thursday, 16 October 2014
Carnivàle Truck 6
This is just a very quick post to show some progress on the truck cab, I'm nearing the home stretch now and yet again have jumped too far forward without taking enough photos.
Labels:
carnivale,
Gaz-AA,
historical,
Senex Puerilis,
truck,
Weathering,
Zis-5
Sunday, 12 October 2014
Carnivàle Truck 5
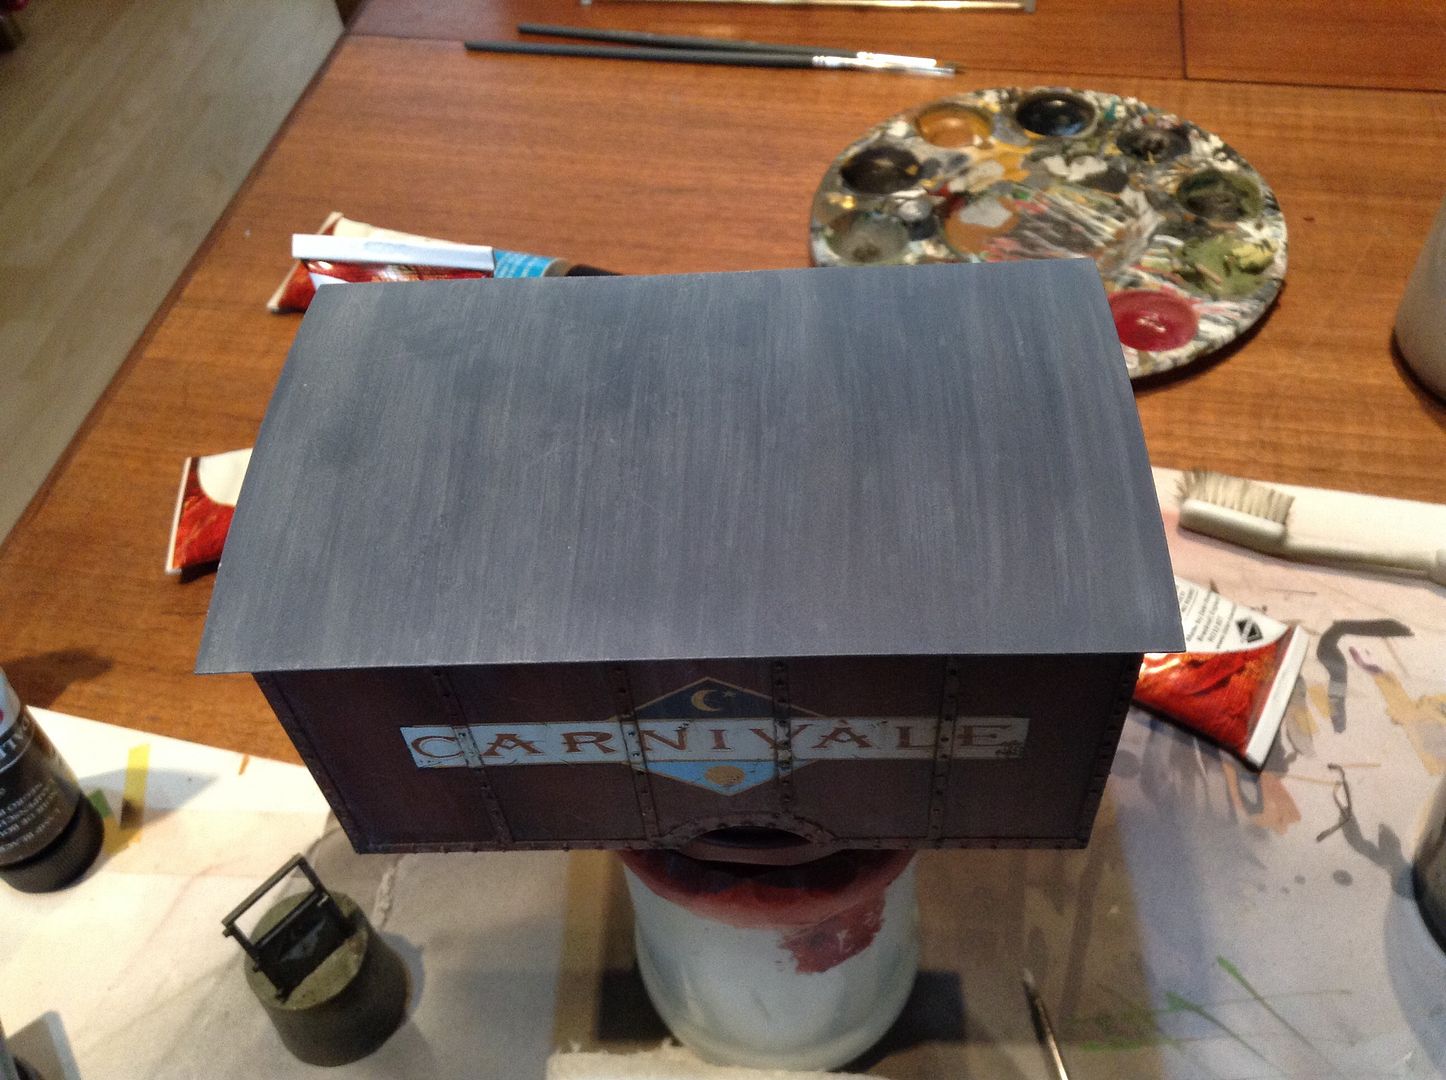
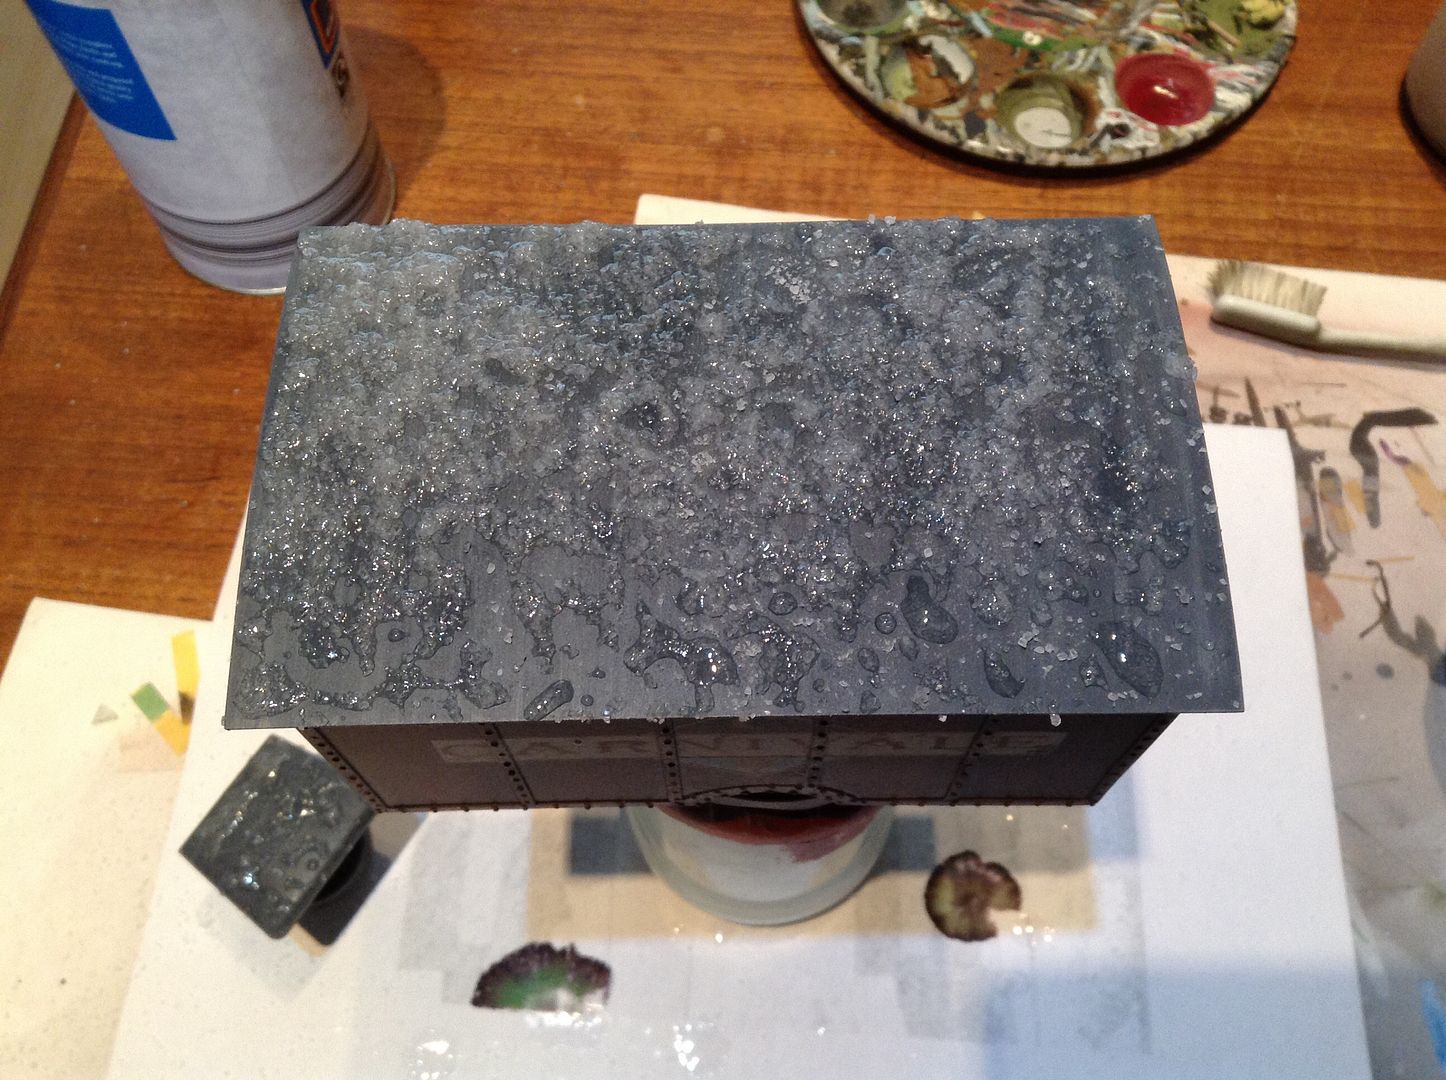
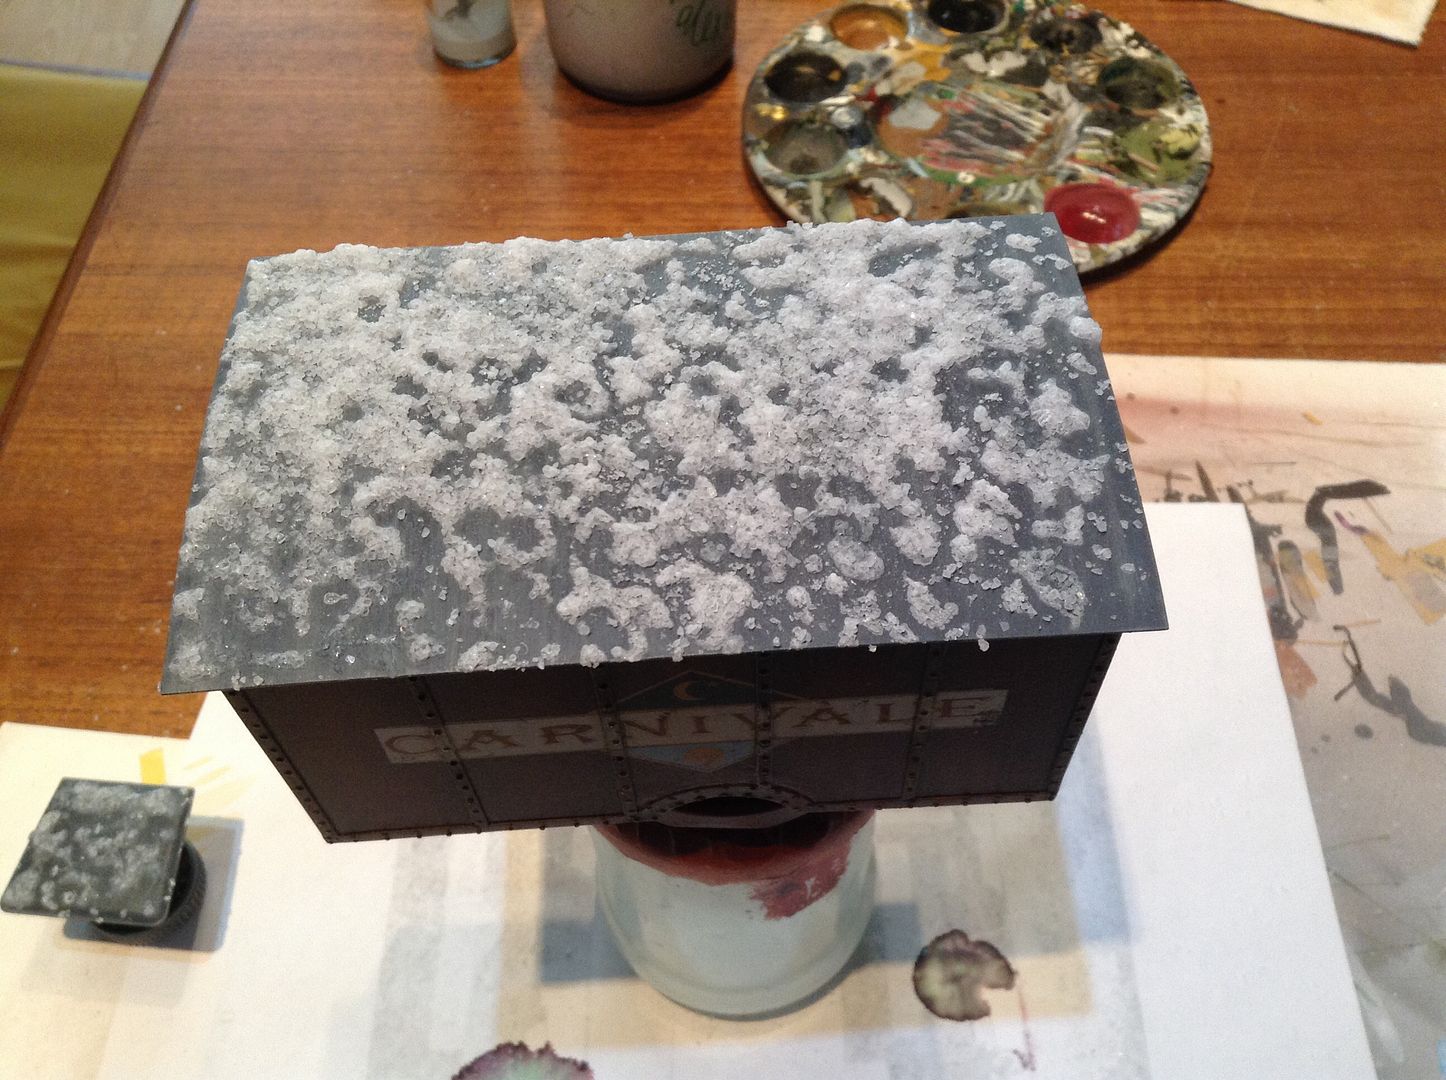
I've made some pretty good progress on the truck so far, I'm quite far into the weathering stages and thought it would be a good time to show you a little tutorial of a technique I call salt mapping.
Salt Mapping is a variation of a traditional armour modelling technique called salt masking, which is used to represent areas of worn paint showing through to the undercoat or bare metal of a tank. The masking technique is a great way to add randomness and detail to flat areas, but i've never really found much use for it in my models. My take on the technique though uses semi-transparent layers to create random patches of dirt and dust on a surface, while still letting the essence of the underlying layers show through.
In the first photo the truck roof has been patchily airbrushed and given an all-over streaking with off-white oil paint and white spirits, then left to dry. This provides a nice varied base for the rest of the weathering.
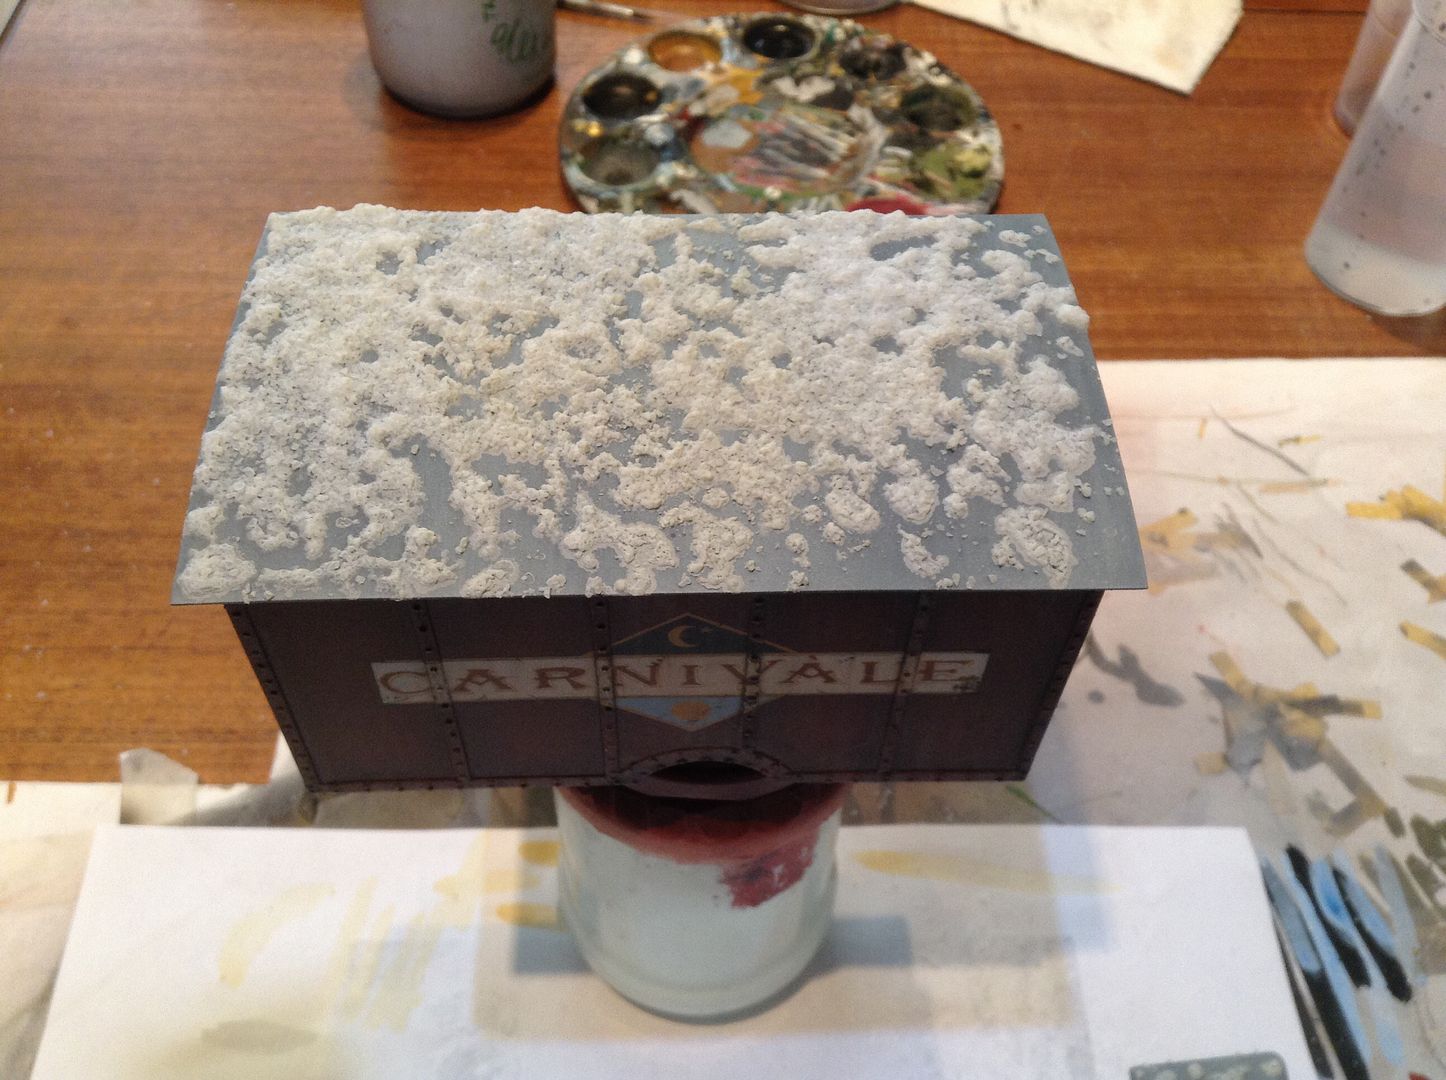
Next the whole roof has been coated with luke-warm water and sprinkled heavily with salt. The painted surface repelled the water a bit and made it gather in droplets, but this all adds to the random effect that I'm going for here.
As the water evaporates, the salt forms crusty patches which loosely adhere to the roof surface. Be delicate when handling the model from this point onwards, you don't want to accidentally knock off your newly formed crystal masks. At this stage, if you don't like what you see you can purposefully detatch areas of the salt with your finger or a wet brush.
Now that the water has fully evaporated (I hurried things up with a few blasts from my wife's hairdryer... shhh, don't let her know I stole it again) you can gently spray a semi-opaque layer of paint with your airbrush. I used a mixture of Vallejo Buff and London Grey, mixed with some glaze medium and water. Try to spray as gently as you can, and don't let the layers build up too much- the aim is to get a dusty, transparent layer, not a solid coat of paint.
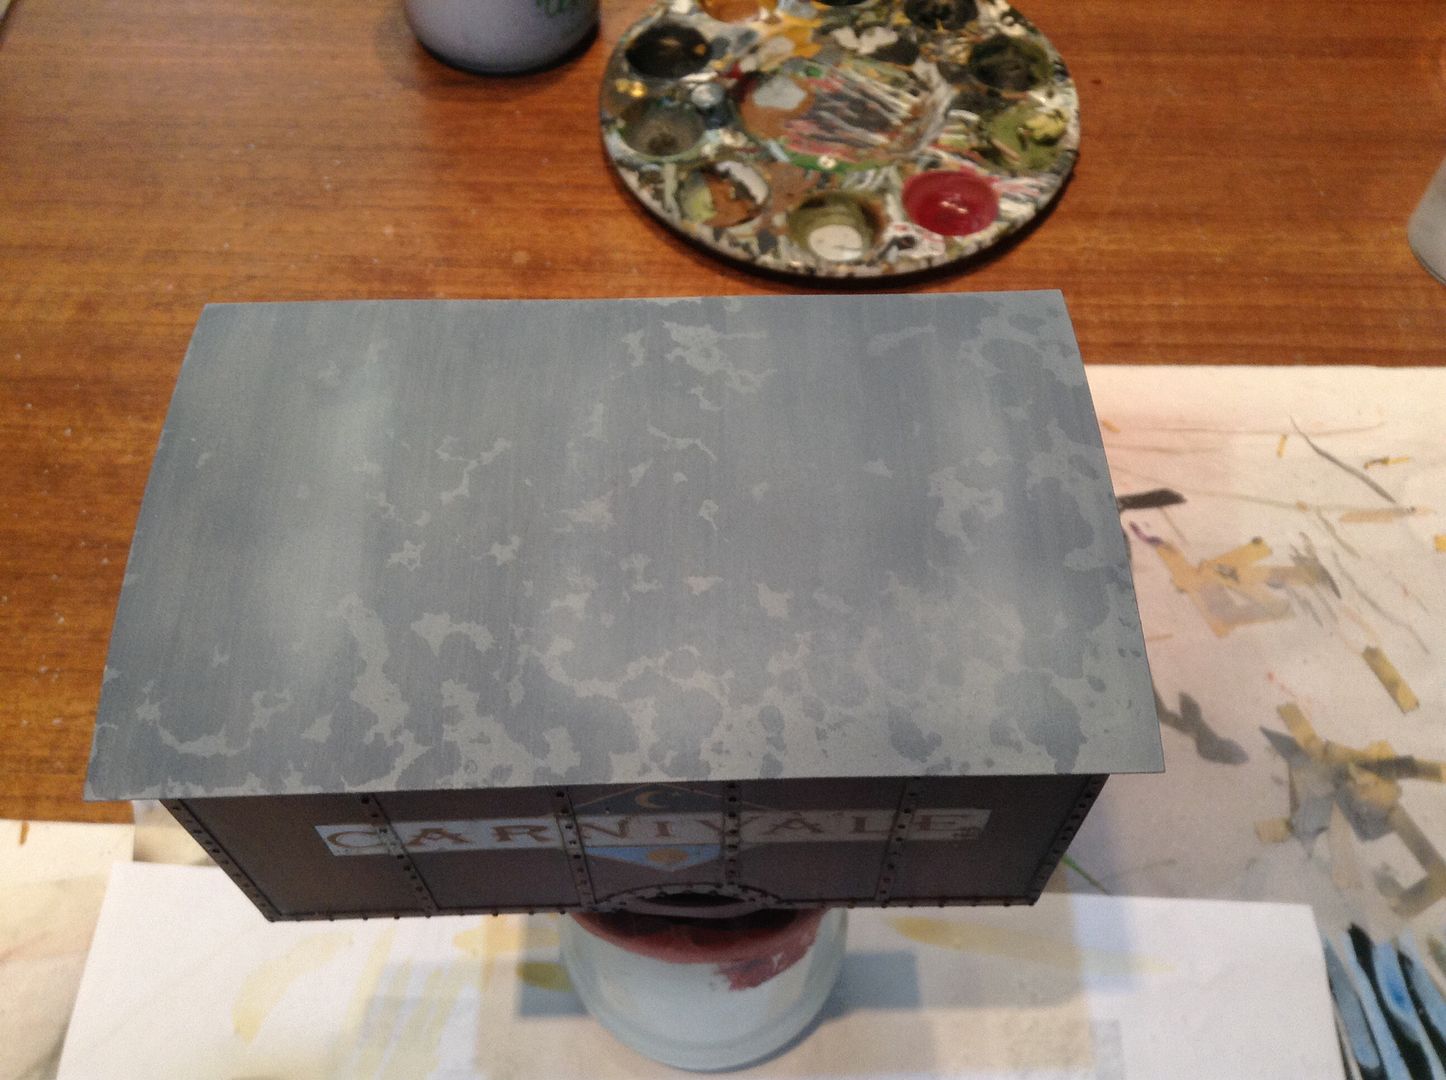
When the paint is fully dry, use a soft brush and some warm water to remove the salt crystals from your model. Go carefully at this stage as you can inadvertently cause little scratches if you're too rough. When you've completely removed the salt crystals, your mapped dirt layer will reveal itself. You can see the underlying streaks are still visible through the random dirt patches, they are unevenly distributed and vary in strength and size- all things that I wanted to help suggest the natural weathering of the roof. The patches are however, too opaque for my tastes (I should've sprayed fewer passes with the paint to make them less obvious)
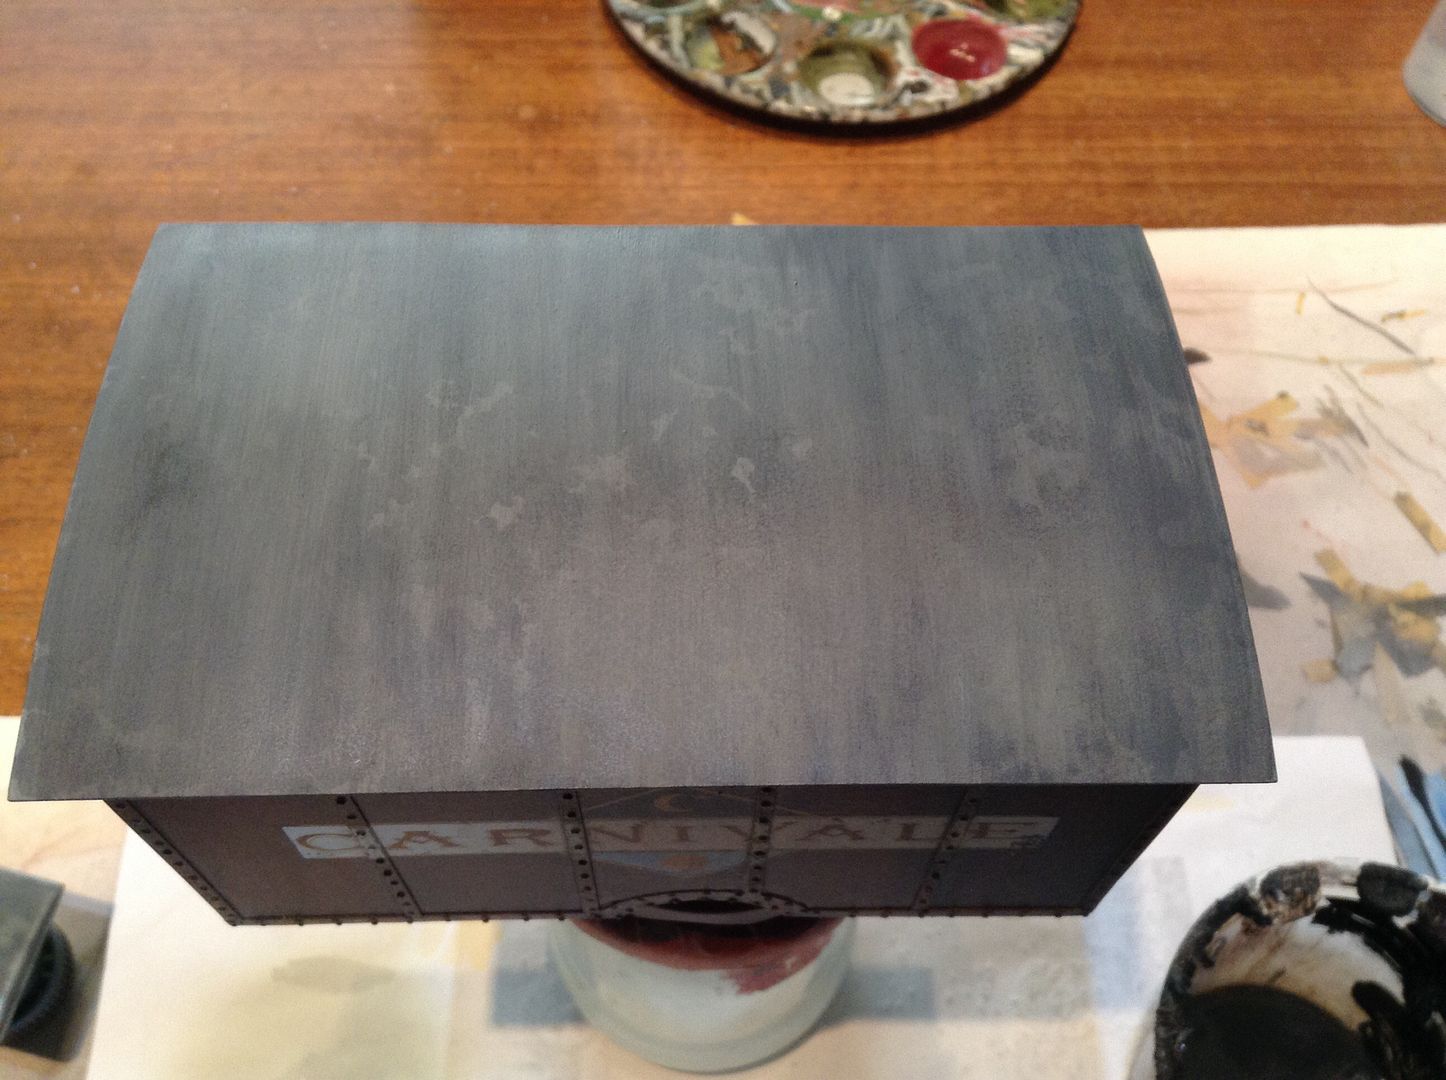
To make the patches blend in more with the previous paint on the roof, I've applied some streaky oil paint in off-white and dark grey all over the roof. When the white spirit has evaporated, I will blend the oils in better with a soft clean brush, to help disguise and soften the edges of my dirt patches.
I'm pretty pleased with the effect so far, and am positive that it'll look just right after a few more layers of weathering get applied.
Labels:
carnivale,
Gaz-AA,
historical,
Senex Puerilis,
truck,
Tutorial,
Weathering,
Zis-5
Wednesday, 8 October 2014
Carnivàle Truck 4
While I was waiting for some oil paints to cure, I knocked up some
detritus to put in the cab and make it feel more lived in. Now, going by plot development these
items shouldn't really be together in one place at any one time, and the
lifemask would never be in the Carnivàle truck, but they're little
flavourful items that add to the identity of the piece.
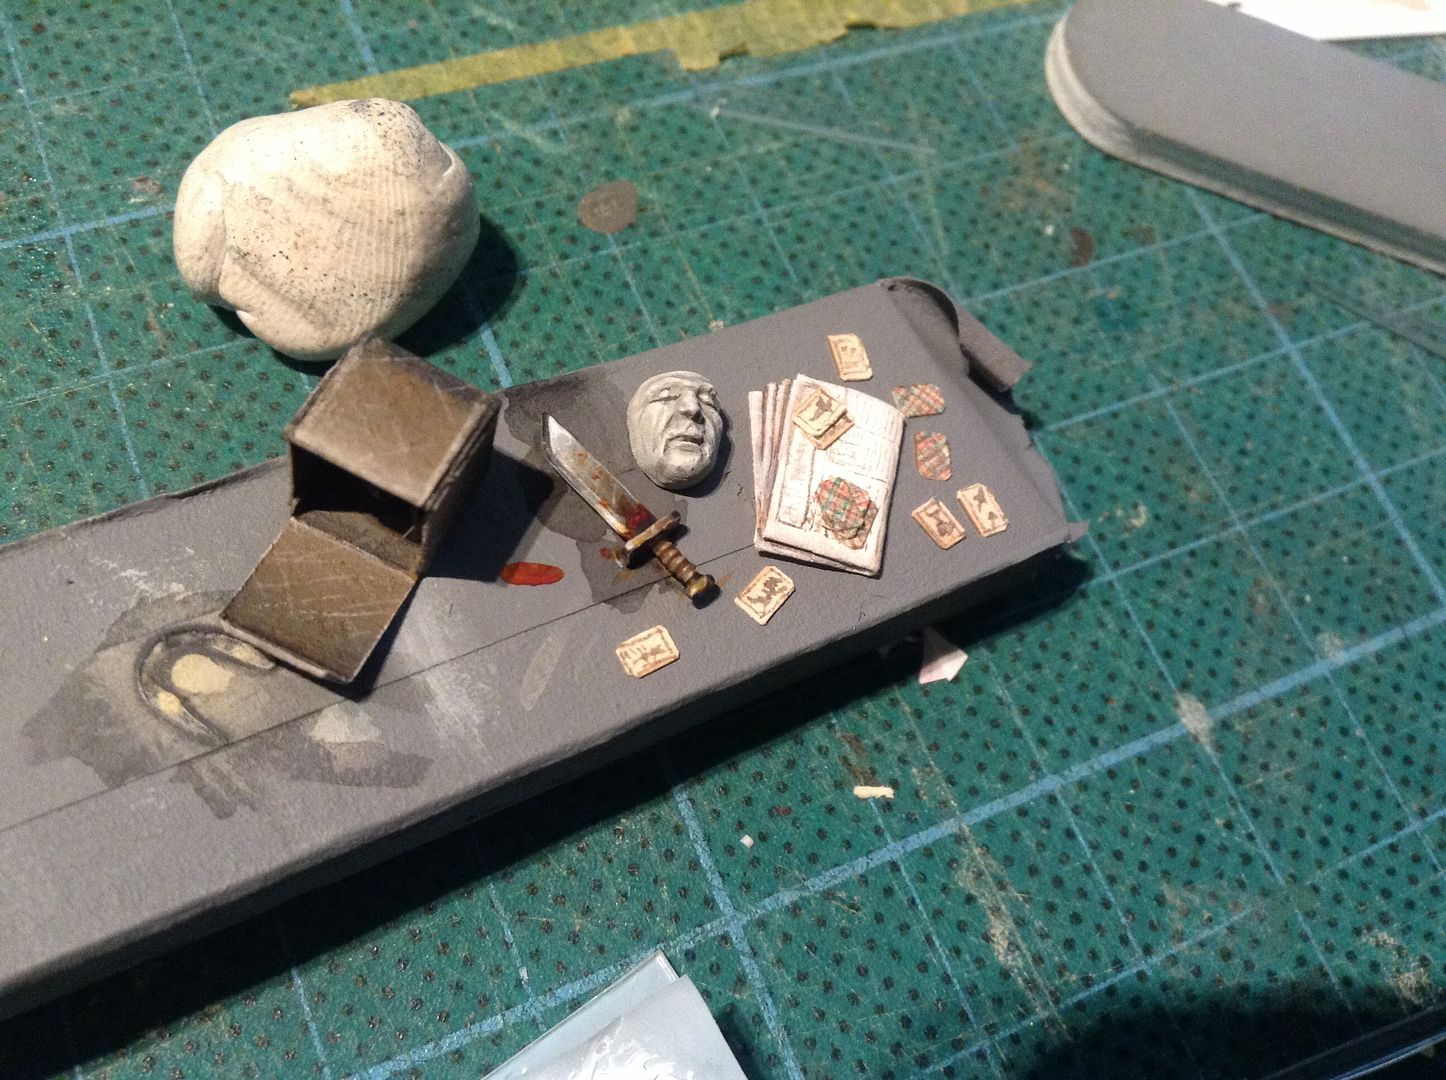
The box is about 6mm by 6mm by 6mm to give you an idea of scale. These items are never going to be particularly visible, they'll be inside the closed cab of the truck and the only way you'll be able to see them will be through the dusty stained windows (to be honest, I haven't tested to see if they'll be visible at all).
Hawkin's lifemask was made from the head of the German driver that came with the Gaz-AA, trimmed down and hollowed out.
The box for the mask was made from paper, reinforced with superglue.
The dagger (which represents the Crone's trench knife) is just a 40k Cadian bayonet- i know it doesn't really look like a civil war era knife, but since it'll barely be seen through the cab windows i figure accuracy isn't that critical.
Sofie's tarot cards are cut from slightly thicker than normal paper and painted up.
The newspaper is made from thin layout paper, soaked through with matt varnish to strengthen it up.
I'm tempted to make a few Nehi bottles too since they feature quite heavily in the series, but i'm not certain how to go about it... Hmmm.
Labels:
carnivale,
Gaz-AA,
historical,
Senex Puerilis,
truck,
Zis-5
Monday, 6 October 2014
Carnivàle Truck 3
Paint! that's right, I've laid down some paint on the truck and I'm starting to like where this is going. At the moment, I've only really applied the acrylic base coats and done a bit of work on the emblems, next comes my favourite part- playing with oil paints and weathering.
All of the acrylics are Citadel or Vallejo Model Colour, most of the colours are custom mixed rather than straight from the pot- matching paint colours to the screen images has been very hard, the lighting changes so frequently across the series, so in turn do the colours to the extreme that the green cab is almost blue in some shots. So I've adopted what I think the real colours should be, once it gets weathered down the colours will blend and become less obvious anyway.
I think next time I try something like this, I'll definitely look into printing decals for the emblems- my freehand skills are nowhere near as crisp as I would like them to be. On the whole though, I'm very pleased with how this project is going.
Labels:
carnivale,
Gaz-AA,
historical,
Senex Puerilis,
truck,
Zis-5
Subscribe to:
Posts (Atom)


